Share
Pin
Tweet
Send
Share
Send
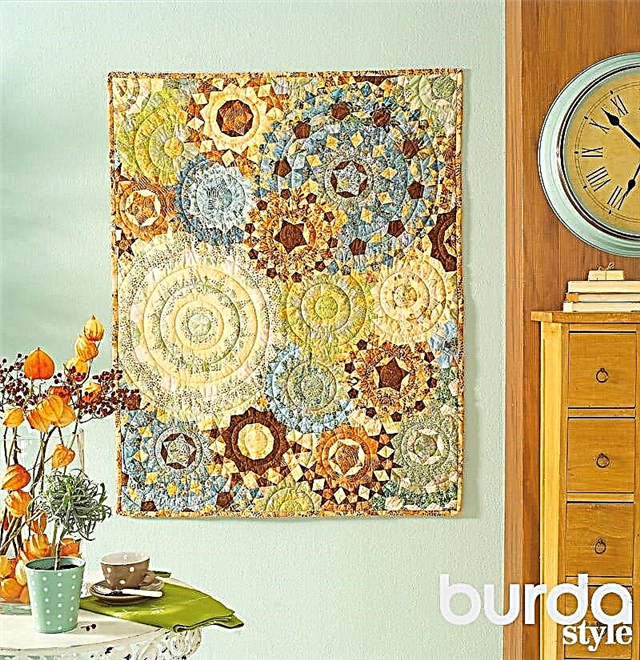
The name of this copyright panel is "Circles on the water." Multicolor, with an interesting visual effect, it is made in an unusual technique from hand-dyed fabrics.
The four elements together, like a coordinated clockwork, set the exact course of time ... A pebble thrown into the water breaks its surface and forms circles that diverge far on the surface. So a man with his seemingly even innocent intervention can violate the harmony existing in nature.
Just a pebble thrown into the water ... even the most insignificant act can have far-reaching consequences - such is the "philosophy" laid down by the author in this small patchwork masterpiece on which a machine stitch is associated with circles on the water. This quilt contains all the colors of our planet: earth, sand, water, sky, trees and grass. Stylized gear wheels, "clinging" one after another, create a single mechanism, the operation of which is easily disrupted ... a small pebble.
The model is made in English technology and has an interesting optical effect. According to the author’s plan, this is a kind of message to the people of the planet, calling for a careful attitude to everything around us.
Quilt size: 144 x 112 cm
You will need
• Hand dyeing fabrics (or batik fabrics):- 14 rectangles measuring 45 x 55 cm in honey colors
- 14 rectangles measuring 45 x 55 cm in light greenish-blue tones
• Fabric "under a batik" in orange tones for a fringing: 45 x 110 cm
• Fabric for the back of the panel: 140 x 170 cm + 15 x 112 cm for the drawstring for hanging
• Volumenfliz (= volume non-woven): 140 x 170 cm
• Threads for machine stitch matching fabric color
• Film and paper for templates
• Water-soluble fabric glue or basting thread
• Wheel cutter, ruler and substrate for cutting
Description of work
Step 1: cutting fabrics and making patterns
From the fabric for edging, cut out 5 strips measuring 8 x 110 cm.Templates, A - E transfer to film for templates. Along the contours, make allowances 0.6 cm wide and cut out the details, see also a master class on the use of patterns when sewing from shreds.

All the parts making up the quilt should be made of paper using the copy machine in the indicated quantity (see instructions below).
Using templates from the film, details (see instructions below) are cut out from the appropriate fabrics in the required quantity and stacked in piles depending on the type and further use.
Note: templates from factory packaging can be used several times.
Circle I:
• fabric in green-burgundy-blue: 12 A
• from fabric in beige tones: 7 V + 3 C + 6 E
• fabric in light green tones: 10 C
• fabric in green burgundy colors: 28 D
• fabric in dark green-purple tones: 14 C
Circle II:
• from brown fabric: 5 A + 10 C + 6 E
• dark brown fabric: 30 D
• beige fabric: 5 V + 5 A
Circle III:
• from dark brown fabric: 10 C + 6 E
• brown fabric: 30 D
• made of pinkish-beige fabric: 11 A
• from dark beige fabric: 5 V
Circle IV:
• from dark brown fabric: 5 V + 6 C
• fabric in burgundy-blue tones: 5 A + 10 C
• blue fabric: 30 D
• blue fabric: 6 E
• made of light brown fabric: 7 A + 5 V
• made of burgundy blue fabric: 21 C
Circle V:
• light green fabric: 5 A
• green ocher fabric: 4 V
• fabric in light green and burgundy colors: 7 C
Circle VI:
• from dark brown fabric: 5 A + 8 E
• from fabric in orange-brown tones: 9 A + 10 C
• from orange-beige fabric: 5 V + 39 D
Circle VII:
• light green fabric: 5 A
• from fabric in green-burgundy-blue tones: 10 C
• fabric in green and blue: 5 V + 30 D
• blue fabric: 7 A + 6 E
Circle VIII:
• fabric in light green-white tones: 15 A + 10 V + 55 D
• white fabric with khaki: 5 V + 50 D + 30 C
• cream fabric: 10 C
• from beige fabric: 6 A + 30 C + 12 E
• in khaki fabric with blue: 10 E
Circle IX:
• white fabric with green: 11 A + 10 C + 6 E
• cream fabric: 5 V + 30 D
Circle X:
• from khaki fabric: 5 A + 34 D + 7 E
• gray fabric with green: 10 C
• from light brown fabric: 8 A + 5 V
Circle XI:
• from gray-burgundy-blue fabric: 5 A + 10 C
• from dark brown fabric: 8 C + 5 V
• beige fabric: 9 A + 7 V + 80 D
• from blue fabric with gray: 24 E
• blue fabric: 9 A + 40 D
• from turquoise fabric with burgundy: 40 C
Circle XII:
The same fabrics are used as for circle VI.
• from dark brown fabric: 5 A + 10 E
• from fabric in orange-brown tones: 10 A + 10 C
• from orange-beige fabric: 5 V + 50 D XIII:
• blue fabric: 5 A
• blue fabric: 5 V
• made of pale blue fabric: 10 C
• blue fabric: 6 A + 5 E
• dark gray fabric: 25 D XIV:
• from dark brown fabric with orange: 5 A + 10 C + 2 E
• beige fabric: 3 A + 5 V
• dark brown fabric: 8 D XV:
• from dark brown fabric with orange: 5 A + 8 E + 39 D
• dark brown fabric: 5 V
• from beige fabric: 9 A + 10 C XVI:
• from dark brown fabric with light brown: 8 A + 1 C
• gray fabric with khaki: 9 C
• green fabric: 7 E + 35 D XVII:
• light green fabric: 8 A
• made of pale green fabric: 6 C
• from beige fabric: 5 V + 2 E
• in khaki fabric: 11 D XVIII:
• from beige fabric with green and brown: 5 A + 5 C
• from light brown fabric: 3 V + 2 C
• brown fabric: 1 D XIX:
• made of orange fabric with dark brown: 8 A
• gray fabric: 3 V
• made of dark brown fabric: 6 C
• pink fabric: 1 E
• from turquoise fabric: 5 D XX:
• fabric in burgundy-green-blue tones: 4 C
• fabric in ocher color: 1 V + 2 D
• in khaki fabric: 2 A

Step 2: carve out intermediate parts
Cut out the following details:• 1 star, consisting of 5 light brown details D, and 1 part E of maroon fabric;
• 1 flower, consisting of 5 blue parts C and 1 blue part C;
• 1 flower, consisting of 4 gray-blue details C and 1 beige details.
From the remnants of various fabrics: 19 rhombuses A, 3 rhombuses B, 32 pentagons C and 5 pentagons E (these details are highlighted in green on the lowest diagram).
Step 3: Assembling Parts
According to the picture below:• Select parts for circle XII.
• Prepare the parts for their connection according to the English technology: put paper templates on the wrong side of the parts from the corresponding fabrics in the middle and pin them with pins. Lubricate the edges of the template with glue, unscrew the allowances along the contour of the fabric part onto the template and glue. Bend the nails with a fingernail. If there is no glue on hand, first bend the folds of the allowances turned onto the template and then bast so that the paper template and basting threads are easily removed.

Step 4: connect the parts
• connect 5 medium rhombs, A to a star; to do this, fold the rhombuses with their front sides, precisely aligning the folds on one side, and sew them in small stitches manually;• to rhombs, And around to sew rhombuses B;
• then connect 10 pentagons C into a ring;
• sew along triangle D to two outer faces of pentagon E, repeat the technique 9 more times;
• orange-brown stars and rhombuses, A stitch together, the resulting block with a star connected to a ring of pentagons C.
Step 5: make circles for the front of the panel
According to the picture above: make 20 circles with intermediate parts for the front of the panel. Attention: the "circle" XVI has a structure different from the others, but the parts are connected according to the same principle and just as easily. In the figure below, the contours of the circles and intermediate parts are marked in red, see also a workshop on assembling parts on rounded lines.Step 6: assembling the front of the panel
According to the figure below: the prepared patchwork details of the panel and the remaining intermediate parts (indicated in bright green in the figure) sew = front part of the panel. Iron the front of the panel. Remove the paper from the wrong side. Align the sections along the perimeter (= white dashed line in the figure).
Step 7: decorative stitch and assembly
Iron the front part of the panel and sweep it with the part made of volumenfliz (= volume non-woven) and the back part of the panel. According to the photo of the model, make a machine stitch in the form of diverging circles. 5 fringing strips to be sewn into one and edging the panel sections - seea workshop on the edging technique.
Pretty & Useful Model from Burda. Patchwork Magazine
Share
Pin
Tweet
Send
Share
Send